How to: Make a Wallet on your Embroidery Machine by Annemarie
January 05, 2022
The wallet consists of 2 In-The-Hoop Designs, joined in the center either with hand stitches or a zigzag stitch on your sewing machine.
Hoop size: 5*7
Size of Wallet when complete: 4.8” x 6.8” large size 4.3” x 6.2” medium size

For this project you will need: • Cut away stabilizer (four pieces of 7” x 9” each - for two hoopings)
• Fabric 1 (we used white) (four pieces of approx 8” x 7”)
• Fabric 2 (we used shades of blue) (eight pieces of approx 5” x 7” – folded in half)
• Thin Batting (two pieces of approx 7” x 5”)
• Embroidery Thread (match your top and bobbin thread)
• Temporary adhesive spray (to keep the fabric in place)
• Scissors (to cut away excess fabric)
• Embroidery Design (stitch file A first as this will be used as a lining with file B)
Embroidery:• Stitch File A first (This will be used as a lining with file B)
• Stitch File A x 2

- Hoop the stabilizer and float fabric 1 on top of the stabilizer.


- Stitch File B
- Color stop 1 = Hoop your stabilizer and stitch the first color stop

- Float the batting on top of the stabilizer. Then add the fabric on top of the batting (to cover the outline stitched in the previous step)
- Color stop 2 = the fabric/batting will be secured in the hoop
- Color stop 3 = The Design will stitch next
- Color stop 4 = Stitch the next color stop = two markers will stitch.
- Fold the 5” x 7” fabric in half and place the fold to align with these markers.

- Color stop 5 = The next color stop will secure the “folded fabric” on 3 sides.
- The top will be open, as this will create the 1st pocket.

- Color stops 6 through 11 = Repeat the previous 2 steps to create 4 pockets in total


- After the last pocket, remove the hoop and place “file A” as a lining to cover the back. Use temporary adhesive spray to hold the fabric in place.


- Pre-last Color Stop = This running stitch will secure the lining
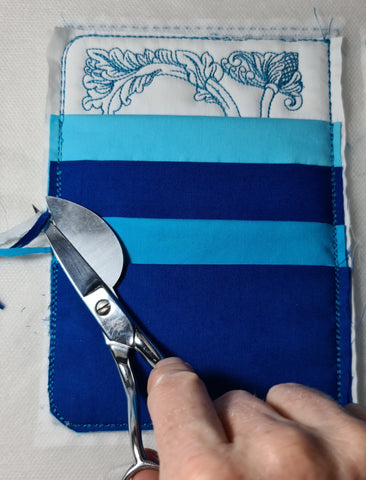
- Remove the hoop and cut away all excess fabric from the front and from the back of the design.

- Last Color Stop = Satin Outline. Place hoop back and stitch the last color stop. This satin outline will cover the raw edges. Once the embroidery is complete, remove the design from the hoop and cut away the excess stabilizer.
- Stitch file C and D. Repeat the same process – these files are simply mirror images of files A and B

• Once you stitched the left (A and B) and right (C and D) panels, you can join the 2 in the center with a zigzag stitch on your sewing machine.


Alternatively, you can hand sew them to each other.
Your project is complete!


Happy stitching!
Annemarie
e-mail: annemarie@astitchahalf.com
CLICK HERE to see our full range of Wallet designs to choose from.
Please join our Facebook Group where we inspire one another on Machine Embroidery and where you will find info on New Designs, Free Designs, Promotions and more.
https://www.facebook.com/groups/784435555820469
Leave a comment
Comments will be approved before showing up.