• Wishlist
  • Sign Up
  • Log in
  • Cart (0)
  • Checkout
  • Home
  • New Designs
  • On Sale
  • Themes 
    • All In The Hoop
    • Bundles
    • Earrings
    • Hexagon Quilting
    • Mug Rugs
    • Necklines and Collars
    • Nerdy Herd
    • Seamless Repeat Patterns
    • Timeless Moments
  • Tutorials 
    • Photo Tutorials
    • Video Tutorials
  • Blog
  • Help & FAQ
  • Contact Us
FanBroidery Blog

How To: Make a Decorative Pillow Sleeve

October 25, 2019

How To: Make a Decorative Pillow Sleeve
  • Cut a 2” seams allowance all around the Design
  • Cut the Sashing from your Contrast Fabric (50” long x 4” wide)
  • TIP: My fabric was not very wide, so I used 2 x 25” long x 4” wide


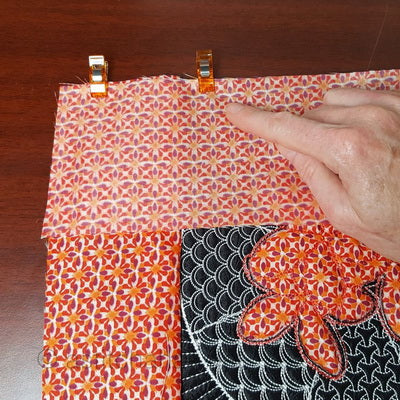
Line up the sashing with the 1st side of the design and pin or clip in place.

  • With a straight stitch on your sewing machine (Stitch Length of approx. 2.5”) stitch the sashing to the design.
  • TIP: I like to stitch from the embroidered side, following the edge of the embroidered outline.

Cut away the excess Contrast Fabric.

  • Fold the 1st Sashing open and align your sashing corners as shown below
  • Pin or Clip and stitch the 2nd side
  • Repeat the process with all 4 sides of the square design

After the Sashing is stitched to all 4 sides, Iron the design.

  • TIP: Use a “press cloth” between your iron and the embroidery to protect your design.

 Align your ruler with the edge of the embroidery and cut all 4 side to measure the same distance from the embroidery.
  • Measure the wide x length of your Project
  • Add 4” to the length and cut 2 x fabric for the back of your pillow
  • The extra 4” will create an overlap at the back
  • TIP: Our fabric for the back measured 13.3” wide x 17.3” long

  • Fold each piece of fabric in half and align the raw edges with the outside of the project.
  • The folded centers will be toward the middle of the Project.
  • Pin or Clip and sew all around
  • Cut the outer-corner to create neat corners when turned outside in
  • Use a letter opener or wooden skewer to push out the corners

Your Decorative Pillow Sleeve is Complete!

CLICK HERE to see our range of Pillow Quilts.


Tweet Share Pin It Email

Leave a comment

Comments will be approved before showing up.


Also in FanBroidery Blog

How to: Make the Stitch & Gather Basket

March 30, 2026 1 Comment

Choose one size — A, B, C, or D — and stitch all panels for that size before moving to assembly.

Continue Reading

How to: Make Freestanding Lace Lanterns

March 18, 2026

assemble your lantern using a sewing machine, hand stitching, or a glue gun—choose the method you’re most comfortable with.

Continue Reading

Customer Project: Timeless Moments Quilt by Judy from Georgia, USA

March 15, 2026 3 Comments

Judy has such a special place in her heart for the Timeless Moments boys and girls — and honestly, don't we all? Those little faces just capture you completely!

Continue Reading

Let's be friends
  • Join us on Facebook
  • Join us on Groups.io
Get the NEWSLETTER

Terms of Use

Terms and Conditions

Privacy Policy

About us


© 2026 aStitch aHalf. Copyright All rights reserved. Powered by Shopify

Amazon American Express Apple Pay Diners Club Discover Google Pay Mastercard PayPal Shop Pay USDC Visa