• Wishlist
  • Sign Up
  • Log in
  • Cart (0)
  • Checkout
  • Home
  • New Designs
  • On Sale
  • Themes 
    • All In The Hoop
    • Bundles
    • Earrings
    • Hexagon Quilting
    • Mug Rugs
    • Necklines and Collars
    • Nerdy Herd
    • Seamless Repeat Patterns
    • Timeless Moments
  • Tutorials 
    • Photo Tutorials
    • Video Tutorials
  • Blog
  • Help & FAQ
  • Contact Us
FanBroidery Blog

How To: Do Reverse Applique

October 25, 2019 1 Comment

How To: Do Reverse Applique

To do Reverse Applique You Need:

  • 1 or 2 layers cut away stabilizer
  • Plain fabric
  • Contrast fabric
  • Batting: Thin layer 
  • Embroidery Thread
  • Sharp point Scissors


  • Hoop the stabilizer and the fabric. (If you want to add a thin layer of batting, it can be placed between the stabilizer and top fabric)
  • Stitch the Design according to the Color Chart

Stop after the 2d Outline (Inner Line) for the Flower stitched.
Remove the hoop and without un-hooping the design cut on the inner running stitch to remove the center fabric. Remove all the layers of fabric from the inner section as shown below.

  • TIP: I found that sharp point scissors work the best, but you can also try a crafters blade.
  • Make sure you place your design on a wooden board when cutting with a blade


Turn hoop over and use a temporary adhesive pray (suitable for your embroidery machine) to keep the Contrast Fabric and Batting in place

  • Place the hoop back and embroider the next Color Stops.
  • The Contrast fabric will be secured with a Decorative Stitch.


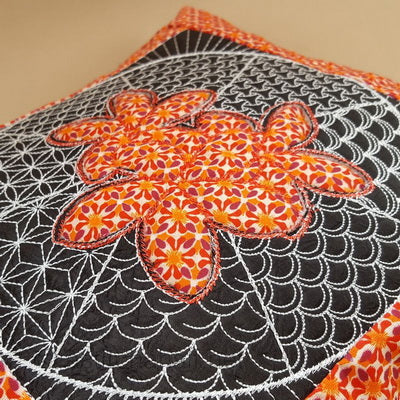
And this is the end result of this Unique Reverse Applique technique.

We use the Sashiko Plumeria Decorative Pillow with Reverse Applique to demonstrate this technique.


Tweet Share Pin It Email

1 Response

valarie arthur
valarie arthur

December 13, 2019

very clear demerstration to understand should not have any problems will be sure to give it a try

Leave a comment

Comments will be approved before showing up.


Also in FanBroidery Blog

How to: Make the Stitch & Gather Basket

March 30, 2026 1 Comment

Choose one size — A, B, C, or D — and stitch all panels for that size before moving to assembly.

Continue Reading

How to: Make Freestanding Lace Lanterns

March 18, 2026

assemble your lantern using a sewing machine, hand stitching, or a glue gun—choose the method you’re most comfortable with.

Continue Reading

Customer Project: Timeless Moments Quilt by Judy from Georgia, USA

March 15, 2026 3 Comments

Judy has such a special place in her heart for the Timeless Moments boys and girls — and honestly, don't we all? Those little faces just capture you completely!

Continue Reading

Let's be friends
  • Join us on Facebook
  • Join us on Groups.io
Get the NEWSLETTER

Terms of Use

Terms and Conditions

Privacy Policy

About us


© 2026 aStitch aHalf. Copyright All rights reserved. Powered by Shopify

Amazon American Express Apple Pay Diners Club Discover Google Pay Mastercard PayPal Shop Pay USDC Visa