

- Home
- New Designs
- On Sale
-
Themes
-
Tutorials
- Blog
- Help & FAQ
- Contact Us

| Enjoy following this photo tutorial for all your Bags with in the hoop Zippers. We used the RACCOON BAG WITH ITH ZIPPER |

Step1. Start by hooping your Fabric and Stabilizer (to match your fabric). Stitch out the “a” file – this will be the front of your zipper bag. Follow the color change sheet in your design zip file. Before the last color stop, add a piece of fabric to back = lining. Keep aside. This design includes 1 x applique step. After the contrast fabric is secured the rest of the design will be stitched.

For this bag you need plain fabric, contrast fabric, a zipper and ribbon (the exact measurements are included in your instant download)

The front panel includes a lining step. This ensures a professional finish of the inside of your bag once complete.

Step 2. File b – Hoop a layer of tear away stabilizer. Stitch out the 1st color stop of FILE b.

Step 3. Place the zipper on the 3 lines indicated. Use scotch-tape to keep in place. Make sure your zipper puller is at the BOTTOM of the hoop (as shown)

Step 4. Stitch the next color stop. The zipper will be secured in the hoop.

Step 5. Fold the 2 pieces of fabric (for the back) in half. I like to iron these 2 pieces to create a neat flat edge. Place the 1 x piece on the top half. Align the folded edge to the zipper “teeth”. Step 6. The next color stop will secure the top fabric. (see image below)

Step 7. Do the same with the 2nd piece of folded back fabric.

Step 8. The next color stop will secure the 2nd back fabric.

Step 9. Stitch the next color stop. This is a satin outline as decorative stitch.

Step 10. Pull the zipper open (toward the TOP)

Step 11. WARNING! Make sure the zipper is pulled to about two-thirds open. After the design is complete the needle will return to the center of the design, and if the zipper puller is in the center it could create a problem.
Step 12. Fold the ribbon (to be used as sling) in half and secure with scotch-tape (as shown in the image below)
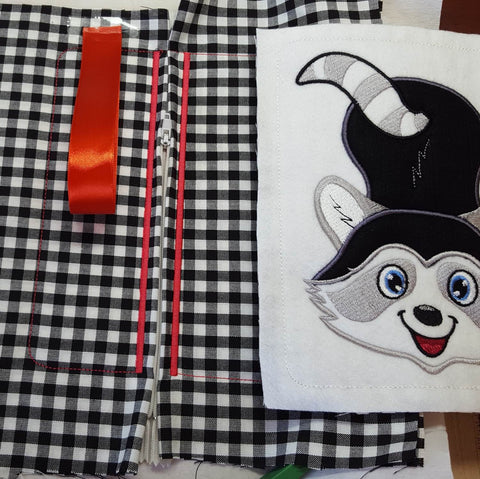
Step 13. You will be using the front design stitched out 1st in this step.

Step 15. Stitch the next color stop. The front and back panels will be secured in the hoop.

Step 16. Remove the hoop and remove the design from the hoop. Turn over and remove the tear-away stabilizer covering the zipper.

Step 17. See image below – after tear-away was removed from the zipper section.

Step 18. Cut away fabric and excess zipper all around. Leaving about half an inch of fabric all around.

Step 19. Cut away fabric from the CORNERS as shown.

Step 20. Make cuts in the fabric – all around. This will ensure neat edges when turned outside in.

Step 21. Turn bag inside out.

Step 22. Add a ribbon to the Zipper Puller (optional).

Your Bag with In the Hoop Zipper is complete!

Comments will be approved before showing up.

Choose one size — A, B, C, or D — and stitch all panels for that size before moving to assembly.

assemble your lantern using a sewing machine, hand stitching, or a glue gun—choose the method you’re most comfortable with.

Judy has such a special place in her heart for the Timeless Moments boys and girls — and honestly, don't we all? Those little faces just capture you completely!


