

- Home
- New Designs
- On Sale
-
Themes
-
Tutorials
- Blog
- Help & FAQ
- Contact Us
How to make the Wrist Clutch and the Fold-over Clutch Purse.
1. Hoop cut-away stabilizer. Stitch out the 1st color stop
This step will indicate where the zipper center should be placed.

2. Place the zipper teeth to match the center line. For the wrist purse the zipper-puller should face toward the top of
your hoop. For the Fold over Purse the zipper-puller should face the left of your hoop. I used masking tape to keep the zipper in place.


3. Make sure the zipper puller is NOT in the stitching area! Stitch the next color stop. The zipper will be secured.

4. Fold the fabric in half and place the fold to line up with the zipper (top section)

5. Stitch the next color stop. The 1st fabric will be secured.

6. Do the same with the 2nd piece of fabric. The next color stop will secure the fabric.

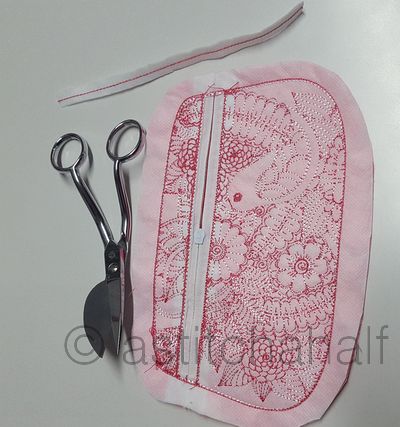
7. Stitch the next color stop. This will be the design.

8. After the design was stitched, pull the zipper puller to the center of the design. This will give you access, to turn the purse outside in.

9. Again I used masking tape to keep my wrist band (ribbon) in place.

10. Place the lining fabric On Top of the Purse Designs

11. Once the last stitch secured the "lining" you can remove the design from the hoop and cut away the excess fabric

12. Turn purse over and careful cut away the stabilizer which covers the zipper area.


13. You should be able to open the purse completely, through the zipper opening. Cut away any sharp corners to create neat corners. Turn Purse outside in.

14. Your Wrist purse in complete.

The Fold over purse is stitched in the same manner as the Wrist purse.


Enjoy making these fabulous purses!
Click on any of the photos to see our Fold-over Clutch Purses.
Comments will be approved before showing up.

Stitch a fabric basket — a structured, free-standing organiser.

Choose one size — A, B, C, or D — and stitch all panels for that size before moving to assembly.

assemble your lantern using a sewing machine, hand stitching, or a glue gun—choose the method you’re most comfortable with.


Anonymous
December 21, 2020
thank you