• Wishlist
  • Sign Up
  • Log in
  • Cart (0)
  • Checkout
  • Home
  • New Designs
  • On Sale
  • Timeless Moments
  • Quilt Progress
  • Themes 
    • All In The Hoop
    • Bundles
    • Earrings
    • Mug Rugs
    • Necklines and Collars
    • Quilting
    • Seamless Repeat Patterns
    • Timeless Moments
  • Tutorials 
    • Photo Tutorials
    • Video Tutorials
  • Blog
  • Help & FAQ
  • Contact Us
FanBroidery Blog

How to: Make the Japanese Sashiko Circle Bag

October 21, 2019 1 Comment

How to: Make the Japanese Sashiko Circle Bag

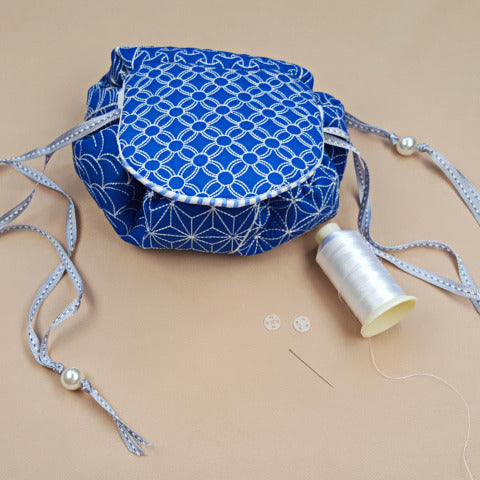
We used the Japanese Sashiko Circle bag to create this tutorial. You can create all the circle bags with this tutorial.

To make this Fully Lined Circle Bag You Need:

  • 1 or 2 layers cut away stabilizer (per hooping)
  • Optional: Thin layer of batting – per hooping
  • ½ Yard plain fabric (front and back)
  • ½ Yard contrast fabric (for the lining)
  • Bias Tape for the Drawstring (approx. 46” cut in half x 4” wide) We used Store Bought Bias Tape
  • Ribbon or String (approx. 104” cut in half x 1 to 2” wide)
  • Temporary Adhesive Spray eg. 505 Spray
  • Embroidery Thread
  • Scissors
  • Snap Fastener x 1 (Size 3 / 0.5”)
  • Sewing Needle to hand stitch the Snap Fastener
  • Optional: Embellishment eg. We added a tiny pearl on each end of the ribbon


Embroidery:

  • Hoop your stabilizer
  • Stitch the 1st Color Stop
  • Place the fabric to cover the outline
  • Stitch out the design

When The design is stitched, turn hoop over, add lining to the back and stitch the last color stop.
Please note: The individual pieces will not be lined in the hoop, but after all 8 panels are joined.


Cut a 1” seam allowance once the embroidery is removed from the hoop.

The lining for the Flap will be placed ON TOP/FRONT of the hoop, as you will be turning the flap inside out.

With a straight stitch on your sewing machine, sew the flap to the inner circle

You can make your own Bias tape or use store bought bias tape. We joined 2 x 2” wide bias tape to have the desired 4” wide Bias Tape. (approx. 46” cut in half x 4” wide)


Iron bias tape flat and cut the ends. Divide each strip in half and mark with a pin. (23” strips x 2)

The flap will be the front, so start pinning the bias tape from the left to the right side of the flap (see image below)
Overlap the 2 sections of bias tape slightly to cover the raw edges. Secure with a straight stitch.

Fold Bias Tape over to the Back (or lined section) pin and secure with a straight stitch.

Insert your cord or ribbon from the 1 end and out the same side where you started. Do the same for the opposite
side.

Add an embellishment if you desire. We added a little pearl.

Attach the snap fasteners as shown below and your Circle Bag is Complete!

Enjoy stitching!


Tweet Share Pin It Email

1 Response

paulette
paulette

January 15, 2020

bonjour
je viens d’acheter le modèle japanese sashiko et je voudrais faire le sac + grand ma machine pr620 a un cadre de 200 sur 300 cm peux t’on broder les morceaux séparément et ensuite les assembler?? pour avoir le rond + grand il faut laisser des coutures d’assemblages? merci de me renseigner bonne journée paulette

Leave a comment

Comments will be approved before showing up.


Also in FanBroidery Blog

How to: Dream Big Panel Twisted Hexagon Quilt

January 27, 2026

a quilt that grows beautifully, one block at a time. The Dream Big Spectrum Quilt is a beginner-friendly...

Continue Reading

Customer project: Copper Song Bundle Trivets by Irene

January 22, 2026

Irene said: "Finished off this trivet today despite having a broken left wrist. Hubby helped me a bit and the front was already done before I broken my wrist ...

Continue Reading

Project idea: Quilt with Twisted Hexagon

January 11, 2026

Create a cherished heirloom quilt featuring these precious little girls using...

Continue Reading

Let's be friends
  • Join us on Facebook
  • Join us on Groups.io
Get the NEWSLETTER

Terms of Use

Terms and Conditions

Privacy Policy

About us


© 2026 aStitch aHalf. Copyright All rights reserved. Powered by Shopify

Amazon American Express Apple Pay Diners Club Discover Google Pay Mastercard PayPal Shop Pay USDC Visa